Purpose
A hurdle I’ve encountered is how to get rsh to work between Windows 7 Ultimate and Ubuntu 10.04 LTS.
We’re starting with two limiting factors, which I learned the hard way:
- rsh-server coming with Ubuntu 10.04 uses a configuration file pointing to a PAM security module that was missing from the system. The /etc/pam.d/rsh points to the old pam_rhosts_auth.so (which supported the promiscuous option which all tutorials talk about), but my system only has pam_rhosts.so.
- rsh.exe is not found in Windows 7 anymore, so we have to manage using some other tools to connect.
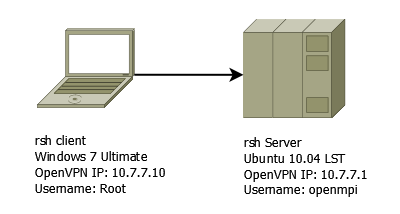
Network configuration:
The following diagram shows the network layout:
The goal is to be able to invoke commands from the Windows machine (client) to Ubuntu (server) using rsh.
First we need to configure the rsh server (linux part), then find a suitable Windows client, then test that is working.
rsh server configuration
This is the most complex part – and a lot of things have to be in order. I had troubles to get it to work because of bad configuration files installed by default and because of lack of verbosity of rsh as well as pam modules.
These are the steps:
1. Install the three packages:
apt-get install rsh-server rsh-client xinetd
xinetd is required, as it is running the rsh server.
Also, from now on, the rsh-server service name is ‘shell’ as you will see below.
2. Make sure to check /etc/services to contain a line like the one below:
shell 514/tcp cmd # no passwords used
We need the shell service present there, since that’s what xinetd looks for when a connection arrives on port 514.
3. Make sure to check /etc/inetd.conf if it has this line:
shell stream tcp nowait root /usr/sbin/in.rshd
This file tells to xinetd what to execute when a connection arrives on port 514. The link to the /etc/services above is the service name ‘shell’.
4. Update the security that comes by default with rsh.
Edit the file /etc/pam.d/rsh to match the values below:
# disable access to users that have no login specified
auth    required        pam_nologin.so
auth    required        pam_env.so

# restrict access based on the /etc/hosts.equiv and ~/.rhosts
auth    required        pam_rhosts.so

# Standard Un*x authorization.
# @include common-account

@include common-session
This instructs pam to reject any logins for user names that are marked as no login, then to use some environment variables which I did not check it (since its working). The third auth line is the most important, it instructs pam module to accept connections based on the /etc/hosts.equiv and username’s ~./rhosts file. For further details, please check the man page of pam_rhosts, it describes the rules exactly. Basically you need both /etc/hosts.equiv and the .rhosts files to allow the access.
I have commented out the @include common-account, so that PAM doesn’t check against the users physically having accounts on Ubuntu, since the Windows user that we’ll use (Root) might not have an account there.
The standard configuration file was not correct since it pointed to an inexistend pam_rhosts_auth.so security library which I did not have on my system:
13252 open("/lib/security/pam_rhosts_auth.so", O_RDONLY) = -1 ENOENT (No such file or directory)
This brings me to an important point. Debugging.
Debugging
If you don’t understand what happens after all, you can activate strace for rsh, since both rsh and pam are quiet even if there are problems (such as modules not found, etc).
Basically, in the /etc/inet.conf you need to change the service line for shell to execute strace instead of in.rshd:
shell stream tcp nowait root /usr/bin/strace -f -s 128 -o /tmp/rshd.strace /usr/sbin/in.rshd
This will produce a /tmp/rshd.strace file which is very long, but it helps when … nothing else works.
A second step is to add the ‘debug’ option for pam_rhosts.so in the /etc/pam.d/rsh:
auth required pam_rhosts.so debug
The log file for the pam modules debug is /var/log/auth.log
5. The last part of configuration is setting up the hosts files so that it will allow the Windows user name.
For this two files have to be modified to allow pam_rhost module to match the remote user name with the remote ip and also with the local account.
a). /etc/hosts.equiv to add a line in format remote_host remote_username
10.7.7.10 Root
b) /home/openmpi/.rhosts needs the same line added:
10.7.7.10 Root
Also, logged in as openmpi you need to
chmod +600 .rhosts
A lot of tutorials say that /etc/securetty has to be updated to include rsh (and rlogin). But this is not needed, since the /etc/pam.d/rsh does not mention pam_securetty.so.
Windows 7
There are two clients that I was able to get to run on Windows 7, a standalone one (.exe) http://www.ccs.neu.edu/home/bchafy/rsh_vista.html and a perl library Net::Rsh which it can be used with ActivePerl.
If the vpn is up and running, you can use the .exe one like this:
C:\rsh>rsh 10.7.7.1 -l openmpi cat /etc/issue
Ubuntu 10.04.1 LTS \n \l
To use the perl library, you can try the code below (adaptation of the code specified in its documentation):
use Net::Rsh;
use Data::Dumper;

$a=Net::Rsh->new();

$host="10.7.7.1";
$local_user="Root";
$remote_user="openmpi";
$cmd="date";

@c=$a->rsh($host,$local_user,$remote_user,$cmd);

print Dumper @c;
The first byte of the reply is either 0 (success) or 1 and then it comes an error.
A successful run looks like this:
C:\rsh>perl rsh.pl
$VAR1 = ' Ubuntu 10.04.1 LTS \\n \\l
';
$VAR2 = '
';
If anything goes wrong, is better to use the perl client, which always shows the error sent by the server like this:
C:\rsh>perl rsh.pl
$VAR1 = '☺Permission denied.
';
Improvements
IPs can be used instead of host names, but there’s always delays in reply from Ubuntu unless the IP of the client is not added in /etc/hosts with a name (and then all the other files /etc/hosts.equiv and .rhosts are updated accordingly). rsh server does host name lookups and it waits for timeout before settling for the IP. Of course, better is if all the nodes within VPN have their own DNS, but … that’s for another article.


Leave a Reply