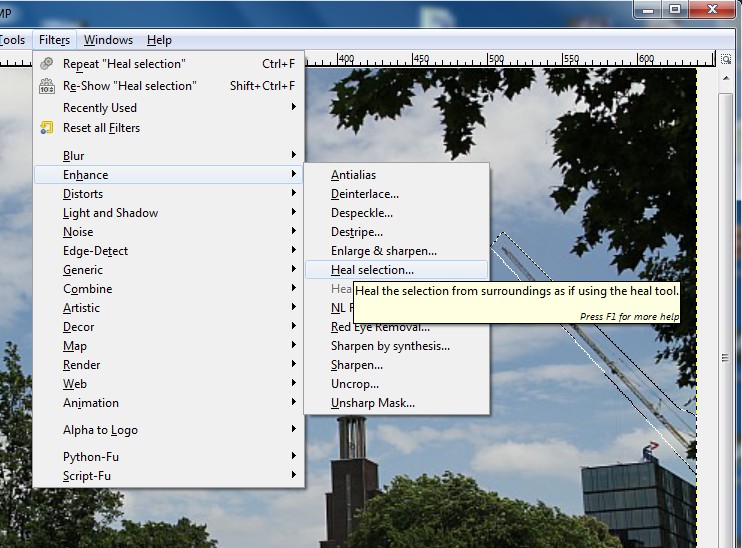
I’m describing my method of finding the specific “AF Micro Adjustments” value given camera + lens. You won’t need printer, tripods, LCD screens, other devices and auto-focus charts, you don’t need EOS Software installed or anything! Just MS Paint .
(I’ve wrote a new post on a more refined way to do focus testing. You can find it here.)
Introduction
When deciding between Canon 60D and Canon 7D, I found a post asking whether the “AF Micro Adjustments” is really needed. My answer ? YES!
Reality
Few days ago I just bought a Canon 7D (just for having the “AF Micro Adjustments” over the Canon 60D) but sadly discovered that more than 90% of the photos were blurry. Even my Canon SX20 IS did much better photos.
An example of a bad photo you can see here (as taken from the camera but saved at 90% to reduce upload size):

- Out of focus image.

IS was ON, 1/30s, F5.6, ISO 125. By all means, this should have been a crisp image. The most disturbing fact was that the camera said the focus is in the center in the image, just to find out later that it was not the case. Focus was locked apparently but image was blurry.
Another example:

- Jamón serrano – Front Focus

1/20s, f5.6, ISO 160. Camera said that focus is in the middle of the plate, just to find out that actually is few centimeters in front.
Lens I’ve tested with
I’ve returned from the shop after testing 5 more lenses (2 x EF-S 18-135, EF-S 60mm, EF 70-300mm L, EF-S 10-22mm) beside mine which is EF-S 18-135 mm; they all needed AF Micro Adjustments for the image to be crisp!
Steps
- No Live View – tests have to be done using camera’s AF sensors.
- In daylight, on ‘Av’ mode using F8 or higher, take some photos of something in the distance (let’s say 30m away) every time adjusting the AF Micro Adjustment value. Starting at -20 and increasing with 5 each time, do 9 photos (-20, -15, -10, -5, 0, 5, 10, 15, 20).
- You must photograph the same thing, for example some shop on the opposite side of the street. Precise framing is not important, but you must have some detail in the photo that you can later zoom in to help in deciding the best image quality.
- Out of 9 photos, one will be the sharpest. I’ve found that is easier to crop the detail and paste it in MsPaint to ease noticing subtle details. Please check below for an example.
- Let’s say that +10 is the sharpest image so far. It means that from +5 to +15 the focus increases in quality, peaks around +10, and then decreases towards +15.In your case the value will probably be different so just take 9 more photos, but now, center the interval around the value that produced the sharpest photo, by using increments of 1. In the given example center around +10: +5, +6, +7, +8, +9, +10, +11, +12, +13, +14, +15.
- Again, paste the detail into MsPaint and decide which one is the sharpest. That will be the final value for the given lens.
Example of a detailed letter ‘e’ taken from a batch of images I took:

- AF Micro Adjustments Sample -20 to 20

These are the first samples from -20 to +20, in increments of 5. In this case, the sharpest seem to be the +5 and +10, so that’s where I would look (by adjusting again between +5 and +15, in increments of 1).
This is the old binary search algorithm 🙂 used to identify which is the sharpest image.
Observations
Camera’s AF micro adjustment feature does not differentiate between same model lenses (Canon 7D, firmware 1.2.5). The manual says that camera will remember up to 20 lens – but in fact they have to be different models. I tried 3 EF-S 18-135 lenses and the camera showed the last AFMa value instead as going back to ‘0’ as it did when changing lens with a different model.
The more out of focus an image is, the more color aberrations were noticeable in the corners of the photo.
Front focus / back focus is noticeable in macro shots (that’s why the other methods tend to insist on small charts) but it proportionally affects the shots taken at wide open. If in macro shots the focus can be few centimeters off, in wide views it can be some meters off (even to the point in which you don’t actually have anything focused).
Front focus / back focus does not affect manual mode nor Live View mode (but both methods are much slower at fixing the focus 🙂 ).
Some people discuss that the focus of their Canon 7D is incorrect and that a full reset is needed by taking out both the batteries. I have to admit that I did also 2-3 full resets – even if I was skeptical about the method. The problem seemed optical and not electrical (in my case the camera was actually reporting focus but the results were not).
Conclusion
After trying out 6 lens, they all appeared to have a degree of variation. The camera itself can be off too.
Having the AF Micro Adjustments at hand is a very very good way of bringing everything together instead of having to send all the materials to the producer to have them realigned. If IQ is important for you, better save more money and get a camera that has this feature.
Ted
Thanks for posting this. I upgraded from a 10 MP XTi and totally lost the ability to take a sharp photo. I have a Canon 100 Macro which took great pictures that looked good cropped down on the old camera and I published a number as post cards. The whole reason for getting the 7D was to be able to crop down harder since I am one of those guys wh can never seem to get close enough to the subject. I got a 70-300 L for the 7D and it looked soft right off the bat. The first time I blamed it on back lighting and then started to suspect the lens until I tested in on the XTi. So researching and finding your post gives me an idea that I am not the only one with the issue. Thanks