This post tries to summarise how to configure the tv tuner’s remote control to be used with tv time on Ubuntu 11.04. My TV Tuner is an AverMedia AVerTV Studio 507 (m507) board just like this one.
The difficulty to configure it comes from a couple of issues:
- tvtime is a very old application (apparently it was last updated on 2005). It has few patches (as version 1.0.2 delivered with Ubuntu 11.04) which makes it play with Alsa. It still works, but the tutorials / configuration files are out of date and won’t work by default.
- some remote control buttons are by default mapped to a multimedia key (for example the Power button on the remote brings the “Shutdown” popup instead of starting / stopping the tv tuner application). But once lirc configured, the remote control keys will be routed through lirc instead of the default mapping.
One advantage is that the tuner works as is with kernel version 2.6.38 that comes bundled with Ubuntu. TV time should show a crystal clear image, but there’s a lot of work to get it to respond to the remote control buttons.
a) Configuring saa7314 module
The first thing to do is to activate the correct module with the correct options. In my case, the values from /etc/modprobe.d/options.conf are:
# value taken from here: http://www.mjmwired.net/kernel/Documentation/video4linux/CARDLIST.saa7134 for id: 1461:a11b (102 works)
options saa7134 card=102 tuner=38 i2c_scan=1 radio_nr=1 ir_debug=1

alias char-major-81-0 saa7134
alias char-major-81-1 off
alias char-major-81-2 off
alias char-major-81-3 off

# options saa7134 card=157 tuner=38
# install saa7134 /sbin/modprobe --ignore-install saa7134; /sbin/modprobe saa7134 -alsa
options saa7134-alsa index=1
options ir-core debug=1
The most important thing to notice is that you might not get your card set up properly since the documents are again out of date. TV Time showed a perfect image using card=157 tuner=38 argument but apparently, the remote keys were not detected, and this stopped progress for a while. It was actually until I read the source code of the module that I discovered that GPIO support for saa7314 module was activated only for card=102 (although according to the documentation, 157 is the value for my card).
Once proper arguments are given (card=102 and ir_debug = 1) that I got the remote keys apparing in dmesg:
[14441.724011] saa7133[0]/ir: build_key gpio=0x20c mask=0x7c8 data=17
[14443.752010] saa7133[0]/ir: build_key gpio=0x3d4 mask=0x7c8 data=30
[14443.908014] saa7133[0]/ir: build_key gpio=0x3c4 mask=0x7c8 data=30
[14444.844045] saa7133[0]/ir: build_key gpio=0x61c mask=0x7c8 data=49
[14445.000010] saa7133[0]/ir: build_key gpio=0x60c mask=0x7c8 data=49
This is mandatory to appear, if you don’t have these logs (push a remote button, then issue dmesg and check at the end, you should see two lines for each button – which mean a press and a release for that button).
If you have those appearing in dmesg, the volume / mute / number buttons should work already in TV Time. However, as you will notice, CHANNEL_UP / CHANNEL_DOWN keys do not work (since there’s no X11 mapping for them, they are specific to a TV viewing application for example). Also, the Power button will in fact trigger the “Shutdown” popup in Ubuntu (which will eventually shut the system down).
A couple of observations here:
- The volume / mute work using the system volume and there are nice popups indicating the action (like you would be using the multimedia keys on a real keyboard). Unfortunately once the routing will be done from lirc the volume stops to work.
- The sound should work in TV Time (if it doesn’t there are few options: “
tvtime --mixer=hw:0/Line” or “tvtime --mixer=default/Line“. If these still don’t make it work you need to remove the .tvtime folder and recreate the channels (sometimes tvtime screws up the configuration)rm -rf .tvtime tvtime-configure --norm=pal --frequencies=europe
If sound works and remote keys appear in dmesg, then this step is done.
b) Identify /dev/input/eventX source for the remote
To identify which event source it is used by the remote sensor, you need to:
$ cat /proc/bus/input/devices
...
I: Bus=0001 Vendor=1461 Product=a11b Version=0001
N: Name="saa7134 IR (Avermedia AVerTV St"
P: Phys=pci-0000:05:00.0/ir0
S: Sysfs=/devices/pci0000:00/0000:00:1e.0/0000:05:00.0/rc/rc0/input5
U: Uniq=
H: Handlers=kbd event5
B: PROP=0
B: EV=100013
B: KEY=fc310 82140000 0 0 0 0 2148000 180 4001 9e0000 0 0 ffc
B: MSC=10
and watch for saa7314 in the output. Beneath it, the Handlers say event5 so that will be the event source. In my case it is 5, but that number will probably be different in your case.
To test that it works, execute the command below and then start pushing remote buttons. You should get buttons like shown below:
$ sudo evtest /dev/input/event5
...
Event: time 1315810851.586142, type 1 (Key), code 114 (VolumeDown), value 1
Event: time 1315810851.586144, -------------- Report Sync ------------
Event: time 1315810851.742136, type 1 (Key), code 114 (VolumeDown), value 0
Event: time 1315810851.742140, -------------- Report Sync ------------
c) installing lirc
First you need the latest lirc version installed. If you don’t have it, run the install command below, otherwise, lirc needs to be reconfigured with “dpkg-reconfigure lirc"
apt-get install lirc
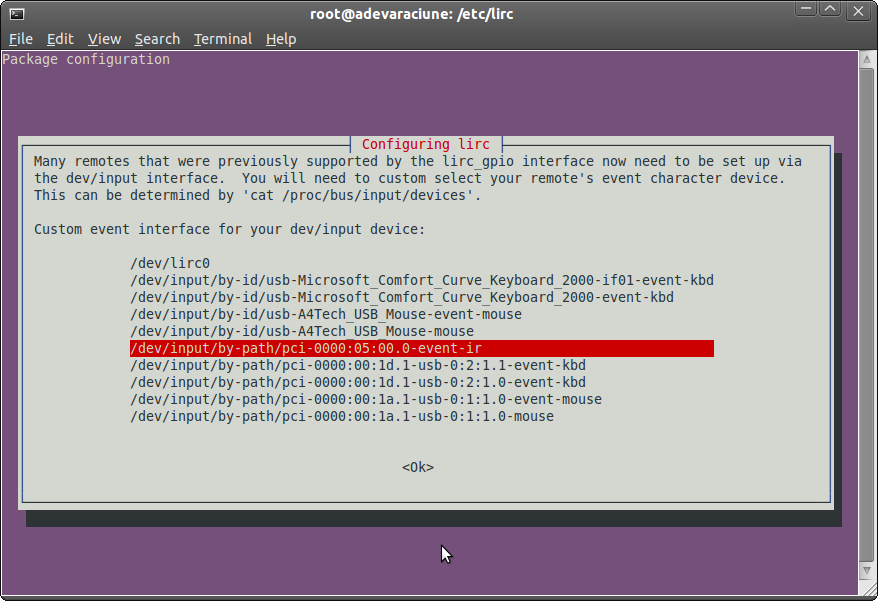
During installation, you will be asked to choose the “Remote Control configuration”. Make sure you select “Linux input layer (/dev/input/eventX)” option, then continue installation / reconfiguration.
On the “Custom event interface for your dev/input device” window, you should select the “…event-ir” value:
Lirc will restart automatically.
To check that remote control buttons are detected now via LIRC, you need to run the command below and watch for output:
$ irw
0000000080010073 00 KEY_VOLUMEUP devinput
0000000080010193 00 KEY_CHANNELDOWN devinput
0000000080010006 00 KEY_5 devinput
One thing to notice is also the remote key/button names: KEY_VOLUMEUP, KEY_CHANNEL_DOWN, etc .. These values are needed on the last step, configuring irexec with .lircrc file.
d) irexec with .lircrc file
TVTime is controlled using two additional programs:
- irexec – which can trigger a program based on a remote button press
- tvtime-command – which sends a TVTime command to tvtime
A sample ~/.lircrc file is attached here.
You need to put this file into your home folder.
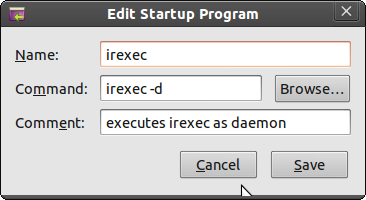
The next step is to run irexec as a daemon. It will interpret .lircrc file and send the according commands. irexec must be executed as the user the commands (not as root). Once you login to your session, you need to:
$ irexec -d
Few things to notice about the .lircrc file provided above:
- it enables the KEY_ZOOM (named “Full screen” on remote) to simulate key ‘F’ in tvtime, by sending the command TOGGLE_FULLSCREEN to tvtime:
begin
prog = irexec
button = KEY_ZOOM
config = tvtime-command TOGGLE_FULLSCREEN
end
- It enables the KEY_VIDEO (named “Source” on the remote) to switch between the aspect ratio (4:3 to 16:9 and viceversa) useful for landscape LCD / LED screens:
begin
prog = irexec
button = KEY_VIDEO
config = tvtime-command TOGGLE_ASPECT
end
- Most important is that the volume keys / mute keys are NOT sent to tvtime, but to the X11 server (and thus the volume up / down popup work!). This is done by faking the multimedia keys Volume Up / Volume Down / Mute keys:
begin
prog = irexec
button = KEY_MUTE
config = xsendkeycode 121 1; xsendkeycode 121 0
end
begin
prog = irexec
button = KEY_VOLUMEUP
config = xsendkeycode 123 1; xsendkeycode 123 0
end

begin
prog = irexec
button = KEY_VOLUMEDOWN
config = xsendkeycode 122 1; xsendkeycode 122 0
end
To fake the system volume up / down keys, I used a program xsendkeycode which you have to install using command:
$ apt-get install lineakd
This program will simulate a keypress by using the given raw key code. 1 and 0 means key is pressed, then key is released. To find out the raw key code, the current key mapping has to be investigated:
viulian@adevaraciune:~$ xmodmap -pk | grep -i audio
121        0x1008ff12 (XF86AudioMute)    0x0000 (NoSymbol)    0x1008ff12 (XF86AudioMute)
122        0x1008ff11 (XF86AudioLowerVolume)    0x0000 (NoSymbol)    0x1008ff11 (XF86AudioLowerVolume)
123        0x1008ff13 (XF86AudioRaiseVolume)    0x0000 (NoSymbol)    0x1008ff13 (XF86AudioRaiseVolume)
171        0x1008ff17 (XF86AudioNext)    0x0000 (NoSymbol)    0x1008ff17 (XF86AudioNext)
172        0x1008ff14 (XF86AudioPlay)    0x1008ff31 (XF86AudioPause)    0x1008ff14 (XF86AudioPlay)0x1008ff31 (XF86AudioPause)
173        0x1008ff16 (XF86AudioPrev)    0x0000 (NoSymbol)    0x1008ff16 (XF86AudioPrev)
174        0x1008ff15 (XF86AudioStop)    0x1008ff2c (XF86Eject)    0x1008ff15 (XF86AudioStop)    0x1008ff2c (XF86Eject)
175        0x1008ff1c (XF86AudioRecord)    0x0000 (NoSymbol)    0x1008ff1c (XF86AudioRecord)
176        0x1008ff3e (XF86AudioRewind)    0x0000 (NoSymbol)    0x1008ff3e (XF86AudioRewind)
208        0x1008ff14 (XF86AudioPlay)    0x0000 (NoSymbol)    0x1008ff14 (XF86AudioPlay)
209        0x1008ff31 (XF86AudioPause)    0x0000 (NoSymbol)    0x1008ff31 (XF86AudioPause)
215        0x1008ff14 (XF86AudioPlay)    0x0000 (NoSymbol)    0x1008ff14 (XF86AudioPlay)
216        0x1008ff97 (XF86AudioForward)    0x0000 (NoSymbol)    0x1008ff97 (XF86AudioForward)
234        0x1008ff32 (XF86AudioMedia)    0x0000 (NoSymbol)    0x1008ff32 (XF86AudioMedia)
As you can see, the XF86AudioLowerVolume has raw key code 123 on my system, XF86AudioRaiseVolume has raw key code 122 and XF86AudioMute has 121.
You need to update .lircrc file to match the values from your system, in case they are different.
The sample .lircrc configuration file from TVTime website is also wrong as it assumes some remote button key names (POWER, 1, 2 …) which do not exist. They are now named KEY_POWER, KEY_1, KEY_2 etc… To find out what remote command button names are used by lirc / irexec, execute irw as described at point c).
TVTime also supports various other commands, to find them all:
$ man tvtime-command
...
BRIGHTNESS_DOWN
Lowers the brightness setting on the input.

BRIGHTNESS_UP
Increases the brightness setting on the input.
....
Thus, if you want to add support for brightness down, just add a new block into .lircrc file:
begin
prog = irexec
button = KEY_RED
config = tvtime-command BRIGHTNESS_DOWN
end
which, when you will press the red key on the remote (it has two black arrows pointing left) it will actually trigger brightness down in TVTime.
e) run irexec at login time
To have irexec executed at login time, just go to System -> Preferences -> Startup Applications and click Add:
Conclusions
This took me some figuring out since there are lots of outdated documentation, configuration files and tutorials out there. If you have any comments, please do not hesitate to post the. The trouble is that given the amount of systems, mappings, versions, etc, it is probably very difficult to make it work as on Windows (where everything worked flawless). Ubuntu still has a lot of catching up to do to bring true multimedia experience without any command line fiddling etc.
But now I have a fully working remote control.


Igor
Hello. Thanks for .lircrc!
I suggest the following update for the .lircrc :
begin
prog = irexec
button = KEY_POWER
config = xset dpms force on; xdg-screensaver reset; tvtime &
config = tvtime-command QUIT
end
This update targets the issue when tvtime starts when either screensaver is active or DPMS mode is on. If screen saver isn’t locked this update will affect KEY_POWER as follows:
display on
screen saver off
tvtime start
This way you can start tvtime when display is turned off or screen saver is active. No need to press any button on the keyboard.
If screensaver is locked – you would have to enter the password before viewing TV.