Introduction
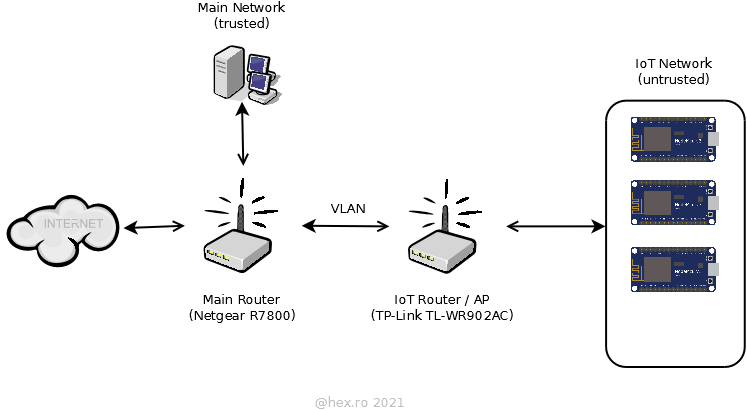
I have several NodeMCUs scattered around the house that are streaming measurements to a central Graphite server.
I was wondering how to isolate the NodeMCUs from the internet as well as from the other devices in the main network in the house, while still be able to access them without having to switch Wireless network ?
Firewall block based on MAC ?
An easy way out would be to just use the firewall and block each device using its MAC hardware address. Conceptually this is impure though, MAC addresses can be cloned… is there a better why to isolate them ? I decided to implement it the right way, using VLANs.
Requirements
I already had the devices and the main router / Access Point – but to isolate the NodeMCUs in their own network, more hardware is needed:
- A second Router / AP, which will be dedicated to IoT devices.
- An Ethernet cable connecting the IoT router to the main router.
- OpenWrt firmware running on both routers.
- Some network / VLAN knowledge
This blog post is more like a wiki page / notes in case I need to redo the setup. Thus, no definitions of VLAN or other concepts, there are plenty resources out there already.
IoT dedicated router / Access Point
The main router / AP is a Netgear Nighthawk R7800; I consider the devices connected to it as trusted. As an IoT access point I have decided to buy a small TP-Link TL-WR902AC router; the devices connected to the IoT WiFi network will be considered untrusted.
Since VLAN work on Ethernet interfaces, a LAN cable has to connect the IoT router with the main router. TP-Link has a single Ethernet plug – good enough – the cable will then go between TP-Link plug and ‘LAN 1’ plug on the main router.

Both routers are running OpenWrt – this is an amazing firmware that brings a lot more functionality to a router than the manufacturers care to offer. Support for OpenWRT was (and will be) a go/no-go purchase criteria. TL-WR902AC was chosen out of a wealth of other small factor routers because it can run the community based OpenWRT.
Currently, Netgear R7800 runs OpenWRT 21.02 and TL-WR902AC runs OpenWRT 19.07.
IoT Router AP configuration
Protocol of the LAN interface:

Physical Settings configuration:

No other additional settings were needed for the IoT router, except of course activating one of the radios (for the 2.4Ghz) and putting a password on it.
There is also no need for the IoT router to provide Network Time Protocol services. The way ESP8266/ESP32 reports its router / gateway IP is by using WiFi.gatewayIP(). Since the interface is configured as a Bridge, the gateway is in fact the Netgear R7800 (the main router). That one has to be configured to provide NTP services.
Not relying on hard-coded values for the NTP server or Gateway gives more flexibility to the network setup should something change in the future, meaning, I won’t have to re-flash the NodeMCU boards with other IPs should my network layout change.
Main Router configuration
The IoT router is connected to the main router’s ‘LAN 1’ port, thus, the main router needs to be told this physical port belongs to a VLAN.
iot VLAN
First step is to add a new interface in the Network / Switch entry. I had made the choice that VLAN ID is 10 (VLAN 1 is already taken). All IPs on that VLAN will be 192.168.10.X. This way it is easier to think of the network diagram …
The VLAN 10 must be tagged for one of the CPUs and untagged for ‘LAN 1’. This means that the traffic outgoing to LAN 1 will leave intact (no tagging applied to it).

iot Zone
A new Zone / Forwardings (called iot) has to be added too. To allow connections from trusted devices (devices in zone lan of the main router) to reach the NodeMCUs, a forwarding should also be added from lan => iot, as in the screenshot below:

iot Interface
With the VLAN and Zones created, the next step is to create the IOT interface. Few key observations, the Protocol must be ‘Static address’ and the IP of the interface is 192.168.10.1. It must be linked to the previously defined VLAN and zone, eth1.10 and IOT.
The Netmask / Gateway / Broadcast addresses, I have set them to 255.255.255.0 / 192.168.0.1 / 192.168.0.255.


A reminder, this router must also provide time services if the NodeMCUs need access to an NTP server.
Firewall rule
Since packages will not leave the IoT Zone this may be a tad limiting if the MQTT server sits in the trusted zone. For this, a Firewall rule must be added, so that packages meant for 1883 port reach the LAN zone:

Finishing up
Now everything is ready for devices to be connecting to the IoT router WiFi connection. They will fetch their DHCP address and will have IPs in the 192.168.10.X range and will not be able to access the internet. However, from the main LAN, trusted devices from 192.168.0.X range will be able to connect to the VLAN IPs (for example, to access the UI of the NodeMCUs).
The NTP server IP is obtained by calling WiFi.gatewayIP() and thus, no need to hardcode the NTP server IP inside the code.
Firewall tunnel is needed to connect to the MQTT server.


Leave a Reply